Hello. In this devlog I want to talk about my NPC system. Before I jump into the code I want to establish some context. In my game “Traitors on the Train”, NPCs are integral to the gameplay loop. The player who acts as a ticket inspector but is secretly a spy must check tickets of each NPC.
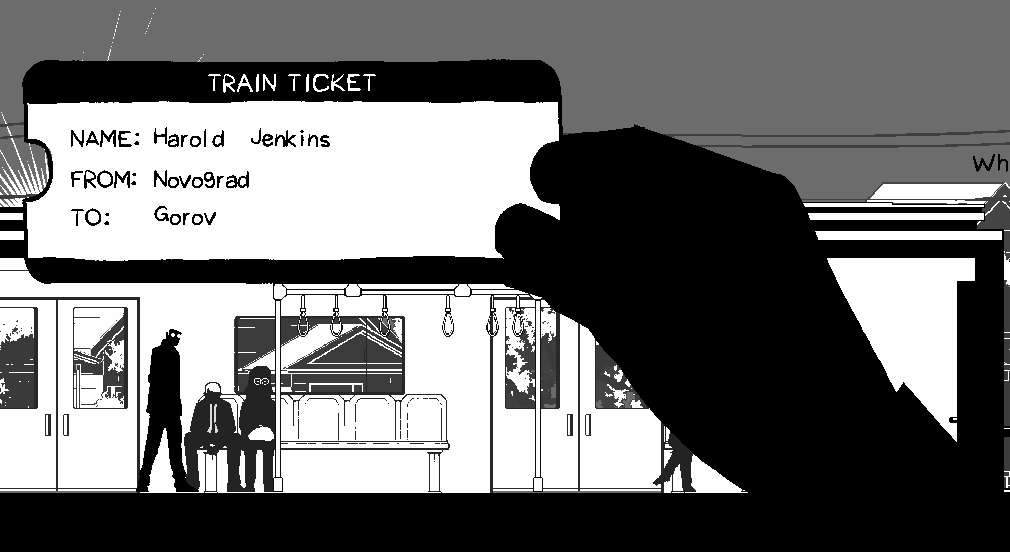
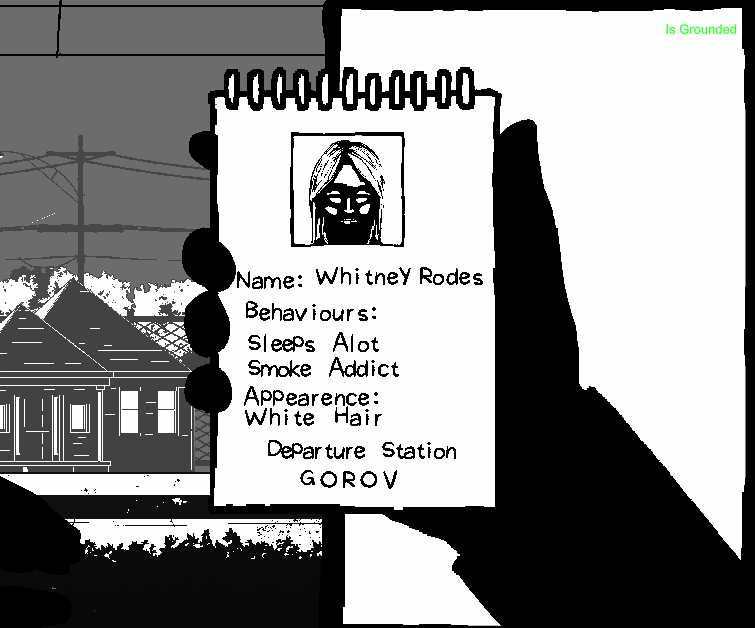
Some NPCs are traitors that must be caught. Based on the profiles that describe the behaviours and appearances of each traitor that are given to the player on a notepad, the player must check the suspected traitor’s ticket and allocate the station they’ll get off at on the given profile. I hope that makes sense.
Currently I have 5 NPC types. Tourist, Glasses Lady, Tradie, Businessman and Necklace Lady. There’s quite a few things established about how NPCs behave and the sort of data that I need to generate for the player.
Behaviour
    [Flags] public enum Behaviours
    {
        Nothing = 0,
        Frequent_smoker = 1 << 0,
        Takes_naps = 1 << 2,
        Always_hungry = 1 << 3,
        Listens_to_music = 1 << 4,
        Lots_of_phone_calls = 1 << 5,
        Enjoys_reading = 1 << 6,
    }
First is behaviour. Each NPC type acts out a mix of unique and generic behaviours. As an example, almost all NPC types sleep, however only the businessman and tradie takes phone calls. I made a firm rule that each NPC instance only acts out two of the however many behaviours that are designated to the NPC type. This is to prevent the situation where an NPC who isn’t a traitor which I dub “bystanders” don’t have the same behaviours and appearances as the traitors. I can see how this would be unfair for the player. The two selected behaviours are randomised upon instantiation of the NPC. I also ensure the behaviour combinations are unique to each NPC by selecting from a pool or structs that I dub “NPCProfile”.
    [Serializable] public struct NPCProfile
    {
        public string fullName;

        public int startStationIndex;
        public int exitStationIndex;

        public int npcPrefabIndex;

        public Behaviours behaviours;
        public Appearence appearence;
    }
Appearance
    [Flags] public enum Appearence
    {
        Nothing = 0,
        White_hair = 1 << 0,
        Blue_collar_worker = 1 << 1,
        Has_a_cain = 1 << 2,
        Near_sighted = 1 << 3,
        Suit_and_tie = 1 << 4,
        Is_bald = 1 << 5,
        Big_boned = 1 << 6,
        Wearing_a_dress = 1 << 7,
        Wears_shorts = 1 << 8,
        Carries_a_bag = 1 << 9,
        Wears_a_hat = 1 << 10,
        Wears_a_necklace = 1 << 11,
    }
Second is Appearance. This one is quite simple. Essentially, I just need to designate a combination of appearance descriptions of each NPC prefab as they are already have predetermined appearances based on how they are drawn. Meaning, if I draw an NPC with glasses, one of the appearances selected in the inspector would be “Wears glasses”. If NPC is a traitor, that one of those appearance descriptions would appear in the notepad.
Name
    [Serializable] public class NameData
    {
        public FirstName[] firstNames;
        public LastName[] lastNames;
    }
    [Serializable] public struct FirstName
    {
        public string gender;
        public string ethnicity;
        public string name;
    }
    [Serializable] public struct LastName
    {
        public string ethnicity;
        public string name;
    }
Third is name generation which could be a topic on it’s own. The world I’m building is based around the public transport of Melbourne. Gender and ethnicity are heavy influencers of what sort of name I generate for each NPC. The challenge is avoiding stereotypes and respecting ethnic backgrounds. For the system however, I just need to make sure I can pair these generated names to the appropriate NPC instance. I do so with the function below where I match names from a JSON file to the gender and ethnicity inputs.
private void Awake()
{
    nameData = JsonUtility.FromJson<NameData>(namesJSON.text);
}

public string GenerateName(Gender gender, Ethnicity ethnicity)
{
    string genderString = gender.ToString();
    string ethnicityString = ethnicity.ToString();
    List<FirstName> firstNamesList = new List<FirstName>();

    for(int i = 0; i < nameData.firstNames.Length; i++)
    {
        FirstName fn = nameData.firstNames[i];
        if (fn.gender.Equals(genderString, StringComparison.OrdinalIgnoreCase) &&
            fn.ethnicity.Equals(ethnicityString, StringComparison.OrdinalIgnoreCase))
        {
            firstNamesList.Add(fn);
        }
    }

    if (firstNamesList.Count == 0) return "NoFirstName";

    int firstNameIndex = UnityEngine.Random.Range(0, firstNamesList.Count);
    string firstName = firstNamesList[firstNameIndex].name;

    List<LastName> lastNameList = new List<LastName>();
    for(int i = 0; i < nameData.lastNames.Length; i++)
    {
        LastName ln = nameData.lastNames[i];
        if (ln.ethnicity.Equals(ethnicityString, StringComparison.OrdinalIgnoreCase))
        {
            lastNameList.Add(ln);
        }
    }
    if (lastNameList.Count == 0) return firstName;

    int lastNameIndex = UnityEngine.Random.Range(0, lastNameList.Count);
    string lastName = lastNameList[lastNameIndex].name;

    return firstName + " " + lastName;
}
Stations
public class StationSO : ScriptableObject
{
    public Station station_prefab;
    public int targetTrainSpeed = 100;
    public int metersPosition = 0;

    [Range(0, 1)]public float busynessFactor = 0.2f;
    public int traitorSpawnAmount = 2;

    public bool isFrontOfTrain;
    [Header("Generated")]
    public bool hadSpawned;
    public  List<NPCProfile> bystanderProfiles;
    public  List<NPCProfile> traitorProfiles;
}
Finally, the stations the NPCs start and end at are huge influencers of difficulty. If a traitor is only on the train for 1 or 2 stations, the likelihood of the player catching the traitor would be quite low. So like most procedural generation systems, fairness and variety need to be balanced. I treat each station as an NPC spawner so I can influence the distribution of NPCs. Some stations can be more busy than others, which reflects real world patterns.
public class Station : MonoBehaviour
{
    public StationSO station;
    ...
    private void SpawnNPCs()
    {
        for (int i = 0; i < station.bystanderProfiles.Count; i++)
        {
            NPCProfile bystanderProfile = station.bystanderProfiles[i];

            float randXPos = Random.Range(
            platformRenderer.renderInput.bounds.min.x + SPAWN_BUFFER,
            platformRenderer.renderInput.bounds.max.x - SPAWN_BUFFER);

            Vector3 spawnPos = new Vector3(
            randXPos,
            transform.position.y + 0.1f,
            platformRenderer.transform.position.z);

            NPCBrain bystander = Instantiate(
            trip.npc_prefabsArray[bystanderProfile.npcPrefabIndex],
            spawnPos,
            Quaternion.identity,
            platformRenderer.transform);

            bystander.profile = bystanderProfile;
            bystander.role = Role.Bystander;
        }

        for (int i = 0; i < station.traitorProfiles.Count; i++)
        {
            NPCProfile traitorProfile = station.traitorProfiles[i];
            float randXPos = Random.Range(
            platformRenderer.renderInput.bounds.min.x + SPAWN_BUFFER,
            platformRenderer.renderInput.bounds.max.x - SPAWN_BUFFER);

            Vector3 spawnPos = new Vector3(randXPos,
            transform.position.y + 0.1f,
            platformRenderer.transform.position.z);

            NPCBrain traitor = Instantiate(
            trip.npc_prefabsArray[traitorProfile.npcPrefabIndex],
            spawnPos,
            Quaternion.identity,
            platformRenderer.transform);

            traitor.profile = traitorProfile;
            traitor.role = Role.Traitor;
        }
    }
    ...
}
How I like to code is very data oriented based. I rely serialized data, static APIs and limited classes to avoid dependencies and cross references. I have a video explaining a bit more in depth as to why. Here I want to talk more about the how.
NPCBrain Class
I start off with the NPC component I call “NPCBrain”. Just for context I call my state machines “Brains” hence the name. The goal I have here as a programmer is to keep the NPC object script in one script. Following my video I linked above, I create a basic switch case state machine. Despite the NPCBrain having many states, the logic to get to each state is very simple. Considering the “Behaviours” enum is a bitmask, I just need to match the current behaviour to one of the behaviour enum flags using an AND operator.
 ... else if ((curBehaviour & Behaviours.Frequent_smoker) != 0)
 {
     SetState(NPCState.Smoking);
 }
 else if ((curBehaviour & Behaviours.Takes_naps) != 0)
 {
     SetState(NPCState.Sleeping);
 }...
When the bitwise result isn’t zero, I set the state. An advantage I found, that is different to how state machines are regularly taught, is decoupling the animations from the states. I can see, that overtime, the states and animations will grow. To reduce the amount states needed, I can couple animations like “sitting eating” and “standing eating” into one “Eating” state. Each state already has access to the first frame, every frame, every fixed frame and the last frame of the being the state so handling the further logic to decide which animation to play can be stored in those scopes. I’ll also take advantage of the simplification that comes with being on a train. NPCs are either standing or sitting for most behaviours so a simple check on whether the NPC is designated a seat will determine which of the animations to play.
        switch (curState)
        {
            ...
            case NPCState.Eating:
            {
                stateDuration = UnityEngine.Random.Range(
                npc.pickBehaviourDurationRange.x,
                npc.pickBehaviourDurationRange.y);

                if (chairPosIndex != int.MaxValue)
                {
                    curClip = atlas.clipDict[(int)NPCMotion.SittingEating];
                }
                else
                {
                    curClip = atlas.clipDict[(int)NPCMotion.StandingEating];
                }
            }
            break; ...
        }
Onto to the behaviour selection logic, I want the NPCs to randomly choose the next behaviour on a timer. The timer value is also randomly selected from a range each time the NPC enters into a new random behaviour state. I have to consider that this logic influences two paradigms, difficulty and naturalness. If the NPC takes a long to change behaviours, the information is more limited to the player. If the range of the timer value is too small, the more robotic the NPC will appear to be. It is too soon to tell where the sweet spots are for these values, but I can tell I will need control here when level designing.
private Behaviours[] behaviourFlags;
private Behaviour curBehaviour
private void UpdateStates()
    {
        switch (curState)
        {
            ...
            case NPCState.Eating:
            {
                if (behaviourClock  > stateDuration)
                {
                    curBehaviour = PickBehaviour();
                }
            }
            break;...
        }
    }

    private Behaviours PickBehaviour()
    {
        return behaviourFlags[UnityEngine.Random.Range(0, behaviourFlags.Length)];
    }
There is also logic outside of behaviours every NPC needs. They all need to be able to find a slide door, board the train, find a seat, find a standing position and exit the train. The challenge here is CPU optimisation. I want a lot of NPCs existing at once. A pattern here is each function calculates a position for the NPC to move towards. Considering the train doesn’t move in world space, these world positions can be cached beforehand to minimise spikes in performance. Lets take for example the FindSlideDoor() method.
    private void FindSlideDoor()
    {
        float shortestDist = float.MaxValue;
        float selectedSlideDoorPos = float.MaxValue;
        for (int i = 0; i < trainStats.slideDoorPositions.Length; i++)
        {
            float dist = Mathf.Abs(trainStats.slideDoorPositions[i] - transform.position.x);

            if (dist < shortestDist)
            {
                shortestDist = dist;
                selectedSlideDoorPos = trainStats.slideDoorPositions[i];
            }
        }
        targetXPos = selectedSlideDoorPos;
        curPath = Path.ToSlideDoor;
    }
The goal here is to find the closest SlideDoor object. Instead of querying each slide door position individually, I cache every slide door’s x position into a float array stored in a scriptable object trainStats.slideDoorPositions and I can loop through those values instead.
    private void SetSlideDoorPositions()
    {
        int slideDoorsPerCarriage = carriages[0].exteriorRenderers.Length;
        int totalSlideDoors = carriages.Length * slideDoorsPerCarriage;

        stats.slideDoorPositions = new float[totalSlideDoors];

        for (int i = 0; i < carriages.Length; i++)
        {
            Carriage carriage = carriages[i];

            for (int j = 0; j < carriage.exteriorSlideDoors.Length; j++)
            {
                int curIndex = i * slideDoorsPerCarriage + j;
                stats.slideDoorPositions[curIndex] = carriage.exteriorSlideDoors[j].transform.position.x;
            }
        }
    }
This is cheaper because it avoids the overhead of interacting with scene objects at runtime which are scattered in memory. Float arrays are contiguous, making iterations to find the closest position much faster. I use the same technique for the other methods too. The con is obviously there’s more arrays to create, paying the upfront cost either in edit time or in the first frame. During runtime, I’m set to maximise my NPC amount with a less performance cost in comparison.
The final framework allows me to scale in a specific way that serves the overall game loop. NPCs hold a duality of purpose, giving hints to the player and world building. Later on, the plan is to create specific NPCs that hold more of a narrative purpose. I plan to have a sports event happen and so the train would be full of sports fans. The framework should support this idea. Sports fans would have sport fan behaviours such as chanting, drinking etc. NPCs interacting with each other is another avenue I want to explore as well which I hope to help further build a convincing world. The idea would be to set the target position to another NPC, once close enough, enter the conversation state and talk until the behaviour timer stops. The framework should hold… I hope. We’ll see how we go.
Thank you for reading.